Hyundai Tucson: Cooling System / Water pump

1. Water pump pulley
2. Water pump
3. Water pump gasket
4. Water pump housing

• Be careful not to damage the parts located under the vehicle (floor under cover, fuel filter, fuel tank and canister) when raising the vehicle using the lift.(Refer to General Information - "Lift and Support Points")
1.Disconnect the negative battery terminal.
2.Remove the engine room under cover.(Refer to the Engine And Transaxle Assembly - "Engine Room Under Cover")
3.Drain engine coolant by loosening the drain plug.(Refer to the Cooling System - "Coolant")
4.Remove the water pump belt.(Refer to the Drive Belt System - "Drive Belt")
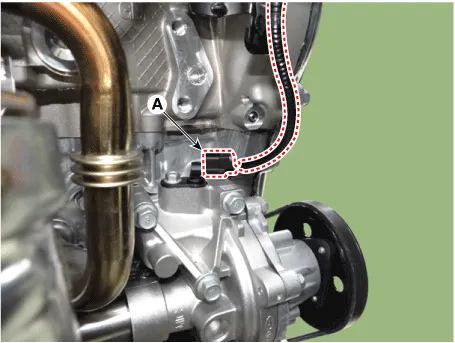
5.Disconnect the water temperature sensor connector (A).
6.Remove the water pump pulley (A).
Tightening torque : 7.8 - 9.8 N.m (0.8 - 1.0 kgf.m, 5.8 - 7.2 lb-ft)

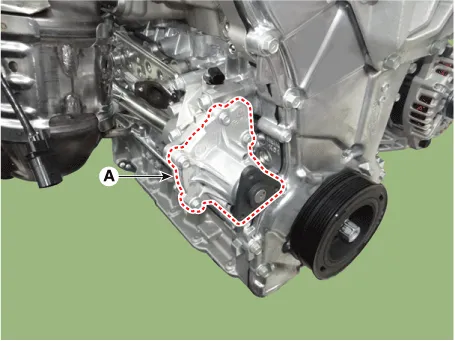
7.Remove the water pump (A).
Tightening torque :9.8 - 11.8 N.m (1.0 - 1.2 kgf.m, 7.2 - 8.7 lb-ft)
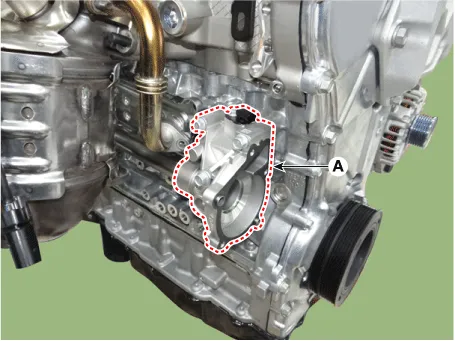
8.Remove the water pump housing (A) together with the gasket.
Tightening torque :18.6 - 23.5 N.m (1.9 - 2.4 kgf.m, 13.7 - 17.4 lb-ft)
9.Install in the reverse order of removal.

• Always use the new gasket.
• Always use the new water inlet pipe O-ring.
• When installing the water pump, apply anti-freeze or soapy water to O-ring.
10.Fill engine coolant.(Refer to the Cooling System - "Coolant")

• Be sure to fill coolant following the ITM coolant filling method.
11.Check the coolant leakage by starting up the engine.
12.Recheck the coolant level.
| Symptoms | Possible Causes | Remedy | ||||||||||||
| Coolant leakage |
| Visually check |
|
| ||||||||||
| ||||||||||||||
|
|
| ||||||||||||
|
| |||||||||||||
|
|
| ||||||||||||
| Noise |
| Inspection with a stethoscope |
|
| ||||||||||
| ||||||||||||||
| Inspection after removing a drive belt |
|
| ||||||||||||
| ||||||||||||||
| Inspection after removing a water pump |
|
| ||||||||||||
| Overheating |
| Loosened impeller |
|
| ||||||||||
|
| |||||||||||||
 Integrated Thermal Management Module (ITM)
- Components
1. Integrated Thermal management Module (ITM)
1. Water inlet pipe2. O-ring
- Description
The Integrated Thermal management Module (ITM) is a device that
controls the c ...
 Active Air Flap
- Description
The AAF (Active Air Flap) is located between radiator grille and
radiator.The AAF controls the motor properly and then the air flaps
adjust air flow from the radiator grille.Durin ...
Other information:
Hyundai Tucson (NX4) 2022-2026 Service Manual: Receiver-Drier
- Replacement
1.Remove the condensor.(Refer to Air conditioning System - "Condensor")
2.Using a Lwrench, remove the cap (A) on the bottom of the receiver-drier.
3.Remove the receiver-drier (A) from condenser using a long nose
plier. Check for crumbled receiver-drier and clogged bottom cap ...
Hyundai Tucson (NX4) 2022-2026 Owner's Manual: Emergency Liftgate Safety
Release
To unlock and open the liftgate manually
from inside the cargo area, perform the
following:
1. Insert a long, flat object, such as a key
into the opening at the bottom of the
liftgate.
2. Slide the latch in the direction of the
arrow to unlock the liftgate.
3. Push the liftgate open.
...
