Hyundai Tucson: Lubrication System / Engine Oil

• Be careful not to damage the parts located under the vehicle (floor under cover, fuel filter, fuel tank and canister) when raising the vehicle using the lift.(Refer to General Information - "Lift and Support Points")

• Prolonged and repeated contact with mineral oil will result in the removal of natural fats from the skin, leading to dryness, irritation and dermatitis. In addition, used engine oil contains potentially harmful contaminants which may cause skin cancer.
• Exercise caution in order to minimize the length and frequency of contact of your skin to used oil. Wear protective clothing and gloves. Wash your skin thoroughly with soap and water, or use water-less hand cleaner, to remove any used engine oil. Do not use gasoline, thinners, or solvents.
• In order to preserve the environment, used oil and used oil filter must be disposed of only at designated disposal sites.
1.Drain the engine oil.
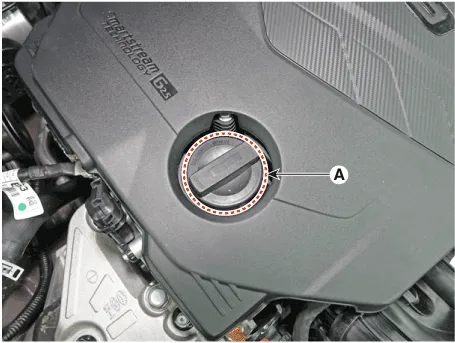
(1)Remove the oil filler cap (A).
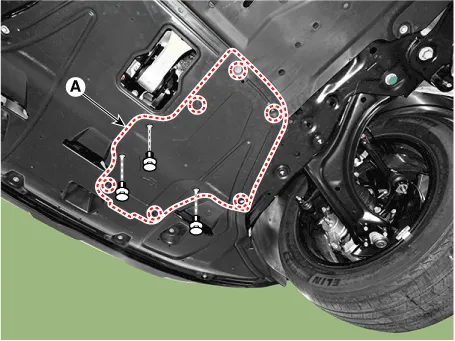
(2)Remove the oil drain cover (A).
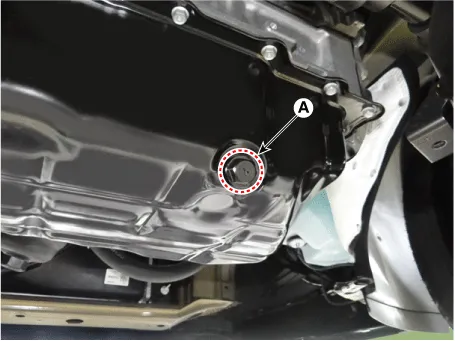
(3)Loosen the drain plug (A) and then drain oil.

2.Replace the oil filter.
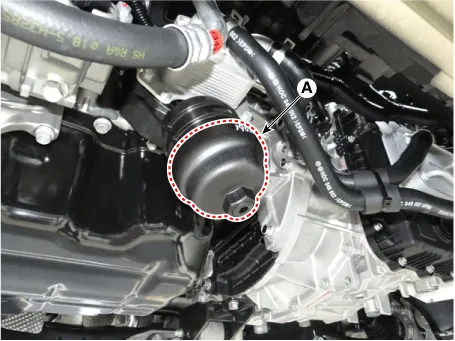
(1)Drain oil in the oil filter by loosening the drain bolt (A) located at the bottom of oil filter cap.

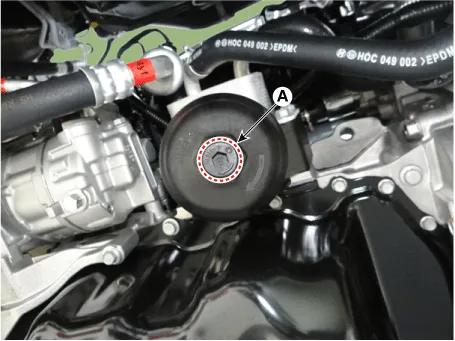
(2)Remove the oil filter cap (A) using a socket wrench.

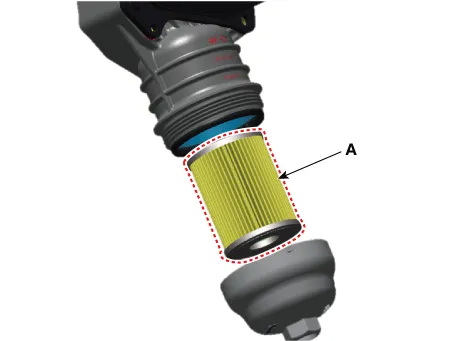
(3)Install the new oil filter (A).
(4)Install the oil filler cap (A) using a socket wrench.Lightly tighten the oil filter cap into place, and tighten it until the O-ring contacts the seating surface.
Tightening torque :25.0 - 30.0 N.m (2.6 - 3.1 kgf.m, 18.7 - 22.4 lb-ft)

• Make sure to drain the engine oil first before replacing the oil filter. If not, the oil may spill on the oil pan assembly side when removing the oil filter and may be mistaken for leakage.
• Always use new O-ring.
• Wipe off the oil and foreign substances remaining inside the filter housing, threads and cover cap threads as much as possible.※ If the residual oil is not removed, it may leak between the cover cap and the housing mating surfaces, which can be mistaken for oil leakage. (The amount of leaking oil and the leaking period may differ depending on the amount of residual oil)
• When assembling the gasket, pay attention to the protrusion direction (A).If assembled in reverse, gasket lifting and leakage may occur.

• After assembling the gasket to the cover cap groove, make sure to press it in the whole circumferential direction (360˚) with fingers so that the entire gasket is seated sufficiently.※ If the gasket is seated incompletely, leakage may occur.
• Remove the foreign substances on the gasket seating surface and inside the cover cap/housing mounting areas.
• Apply minimum amount of oil to the new gasket surface to prevent possible gasket damage.
• Assemble the drain plug to the specified torque using a torque wrench.※ When manually assembling the drain plug using a hexagonal wrench, it may result in the damage to the drain plug or leakage due to the failure to comply with the specified torque.
(5)Replace the drain bolt (A) with a new one and then tighten it to the specified torque.
Tightening torque :4.0 - 5.0 N.m (0.4 - 0.5 kgf.m, 2.9 - 3.6 lb-ft)
3.Fill engine oil.
(1)Install the oil drain plug (A) together with the new gasket.
Tightening torque :34.3 - 44.1 N.m (3.5 - 4.5 kgf.m, 25.3 - 32.5 lb-ft)
(2)Fill new engine oil through the oil inlet.Before filling engine oil, remove the oil level gauge.
CapacityTotal: 6.8L (1.80U.S.gal., 7.19U.S.qt., 5.98lmp.qt.)Oil pan: 5.5L (1.45U.S.gal., 5.81U.S.qt., 4.83lmp.qt.)Oil change (Including oil filter): 5.8L (1.53U.S.gal., 6.12U.S.qt., 5.10lmp.qt.)

• First fill the half of total capacity and then fill the other half after approximate 1 minute has elapsed.
(3)Install the oil drain cover (A).
Tightening torque : 3.9 - 5.9 N.m (0.4 - 0.6 kgf.m, 2.9 - 4.3 lb-ft)

(4)Install the oil filler cap and oil level gauge.
4.Recheck the engine oil level.
5.Recheck the engine oil level.

• Before rechecking the engine oil level, sufficiently warm up the engine.
• If engine is not sufficiently warmed up, engine oil level could be checked below the specified value.
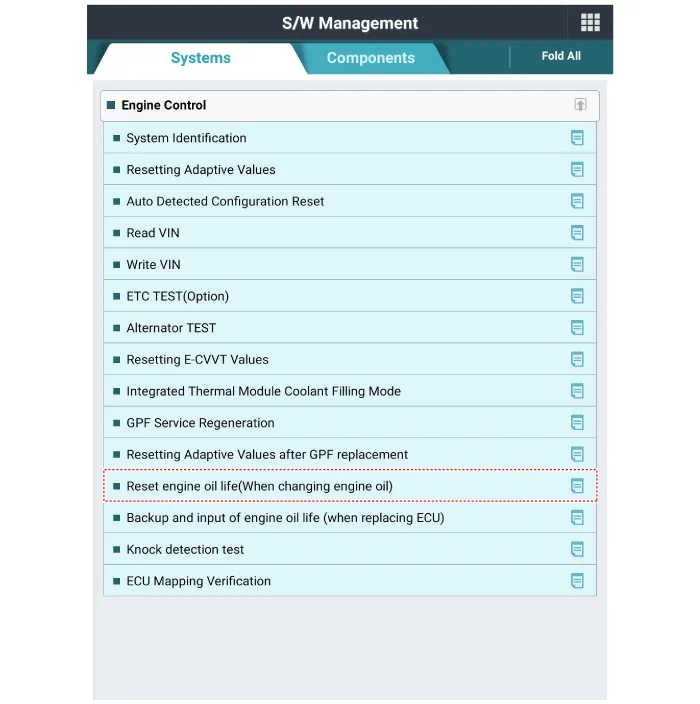
6.After connecting the GDS, perform "Reset engine oil life (When changing engine oil)" of the additional function.
1.Check the engine oil quality.Check the engine oil for discoloration, water intrusion, viscosity drop, etc. If the oil quality is noticeably poor, change oil.
2.Follow all of the oil manufactures recautions.

• Do not fill engine oil above the "F" mark.
(1)Be sure the vehicle is on the level ground in P (Park) with parking brake set and the wheels block
(2)Turn the engine on and warm the engine up until the coolant temperature reaches a conast normal temperature.
(3)Turn the engine off, remove the oil filler cap and pull the dipstick out.
(4)Wait for 15 minutes for the oil to return to the oil pan.
(5)Wipe the dipstick clean and re-insert it fully.
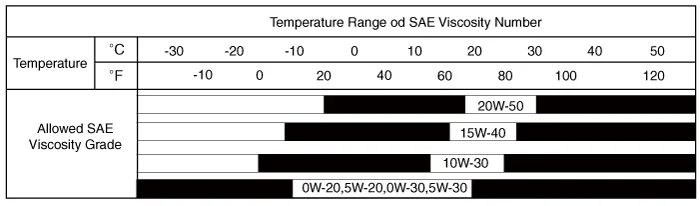

1)Satisfy the requirement of the HMC recommend oil classification.
2)Lubricants that do not have both an SAE grade number and ACEA service classification on the container should not be used.
 Flow Diagram
- Engine oil flow diagram
...
 Oil Filter & Oil Cooler
- Removal and Installation
• Be careful not to damage the parts located under the vehicle
(floor under cover, fuel filter, fuel tank and canister) when raising
the vehicle ...
Other information:
Hyundai Tucson (NX4) 2022-2025 Service Manual: Rear Wheel Guard
- Replacement
• When removing with a flat-tip screwdriver or remover, wrap protective tape around the tools to prevent damage to components.
• Put on gloves to prevent hand injuries.
1.Remove the rear tire.(Refer to Suspension System - "Wheel")
2.Loosen the mountin ...
Hyundai Tucson (NX4) 2022-2025 Service Manual: Front Seat Shiled Outer Cover
- Component Location
1. Front seat shield outer cover
- Replacement
• When removing with a flat-tip screwdriver or remover, wrap protective tape around the tools to prevent damage to components.
• Put on gloves to prevent hand injuries.
...
