Hyundai Tucson: Lighting System / Head Lamps
1.Disconnect the negative (-) battery terminal.
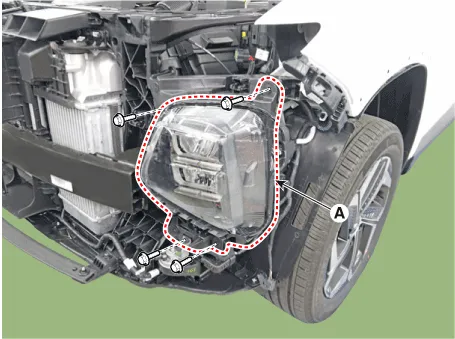
2.Remove the front bumper assembly.(Refer to Body - "Front Bumper Assembly")
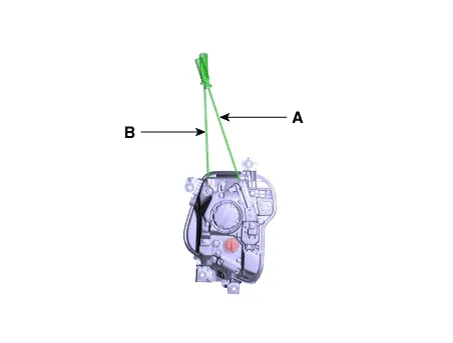
3.Disconnect the head lamp connector (A).
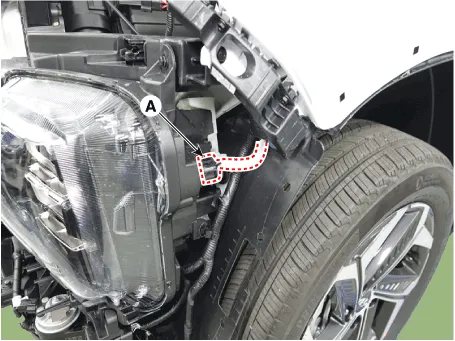
4.Loosen the mounting bolts and then remove the head lamp assembly (A).
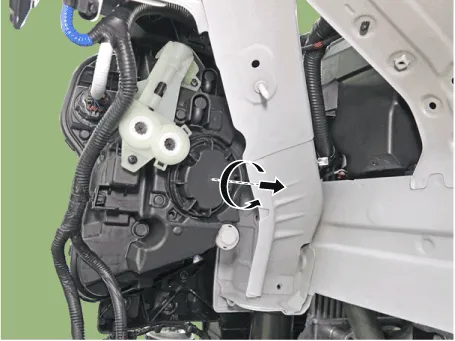
1.Remove the front wheel guard.(Refer to Body - "Front Wheel Guard")
2.Unfasten the screws and then replace the moisture-absorbing agent .

• Fold the moisture absorber as in the illustration below.
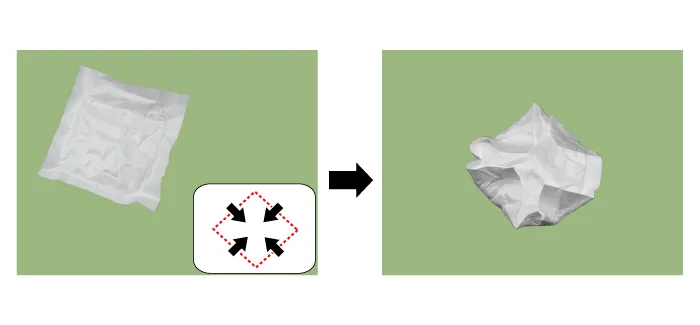
• When installation, install it in the same direction before removing.
1.Install the head lamp bulbs.
2.Install the head lamp bulb covers.
3.Install the head lamp assembly after connecting the lamp connector.
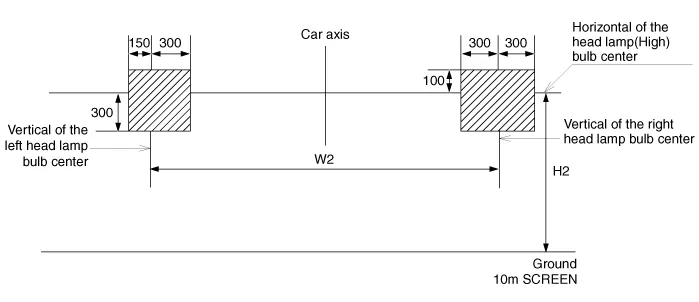
1.Draw vertical lines (Vertical lines passing through respective head lamp centers) and a horizontal line (Horizontal line passing through center of head lamps) on the screen.
2.The vehicle should be placed on a flat ground.
3.With the head lamp and battery in normal condition, aim the head lamps so the brightest portion falls on the horizontal and vertical lines.A : Horizontal (High beam / Low beam)B : Vertical (High beam / Low beam)
1.Measure condition
1)Measurements shall be carried out on a vehicle which has travelled a distance of between 1,000 km and 10,000 km, preferably 5,000 km.
2)Tire shall be inflated to the full-load pressure specified by the vehicle manufacturer. The vehicle shall be fully replenished (fuel, water, oil) and equipped with all accessories and tools specified by the manufacturer. Full fuel replenishment means that the fuel tank shall be filled to not less than 90% of its capacity.
3)The vehicle shall have the parking brake released and the gearbox in neutral.
4)The vehicle shall be conditioned for at least 8h at the temperature between 10~30℃.
5)If a photometric or visual method is used, headlamps with a well-defined dipped-beam cut-off should preferably be installed on the vehicle under test in order to facilitate the measurements. Other means are allowed to obtain a more precise reading (for ex, removal of the headlamp lens)
6)If the vehicle is fitted with a manual leveling device, it shall be ‘0’ position.
2.Vehicle preparation
1)If a visual inspection of the dipped-beam pattern on the screen or a photometric method is used, measurement shall be carried out in a dark environment of sufficient area to allow the vehicle and the screen to be placed. Headlamp center of reference shall be at a distance from the screen of at least 10 m.(In case of In-line, it is set within 1m but it converts to 10m and recognizes cut-off)
2)The ground on which measurements are made shall be as flat and horizontal as possible, so that the reproducibility of measurements of dipped-beam inclination can be assured with an accuracy of 0.5 mrad (±0.05 %).
3)If a screen is used, its marking, position and orientation in relation to the ground and to the median longitudinal plane of the vehicle, shall be such that the reproducibility of the measurement of the dipped-beam inclination can be assured with an accuracy of 0.5 mrad (±0.05 %).
4)During measurements, the ambient temperature shall be between 10~30℃.
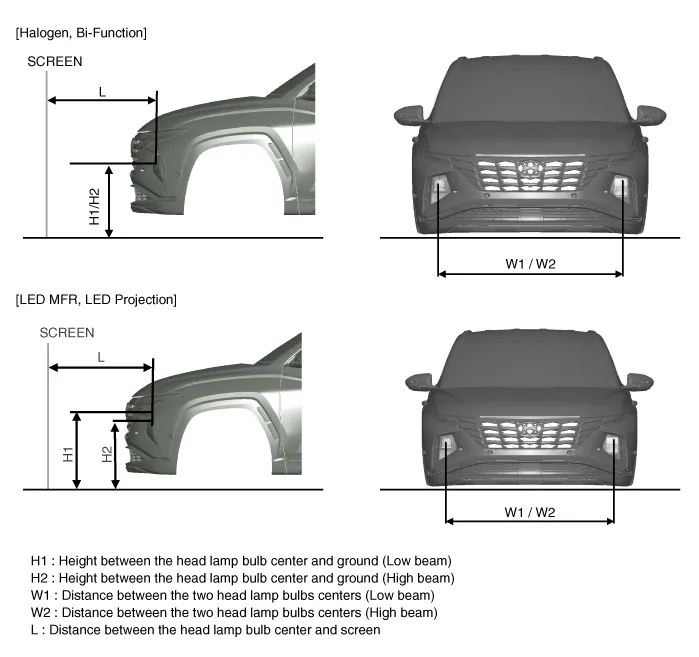
| Option | Vehicle Condition | H1 | H2 | W1 | W2 | L |
| Halogen Bi-Function | Without driver | 644 | 1436 | 1436 | Refer to aiming condition | |
| With driver | 637 | |||||
| LED MFR | Without driver | 660 | 589 | 1434 | 1434 | |
| With driver | 653 | 582 | ||||
| LED Projection | Without driver | 680 | 607 | |||
| With driver | 673 | 600 | ||||
1.Head Lamp (Low beam)
– With the low beam turned on, adjust the cut-off line to be located as shown in the picture below.
– If head lamp leveling device is equipped, adjust the head lamp leveling device switch with 0 positions.
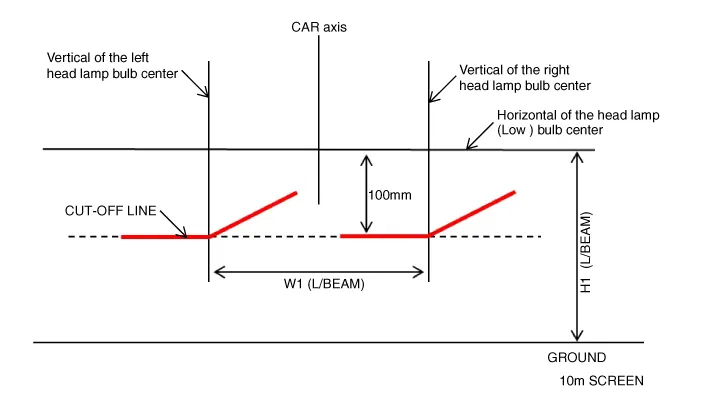
2.Head Lamp (High Beam)
– Turn the high beam on without driver aboard.
– The cut-off line should be projected in the cut-off line shown in the picture.
– When aiming the low beam, vertical aiming shuld be adjusted after adjusting the horizontal aiming.
– If head lamp leveling device is equipped, adjust the head lamp leveling device switch with 0 positions.
 Specifications
- Specifications
ItemsBulb TypeBulb Wattage (W)
FrontHead lamp(STD)Low9005HL+60
High9005HL+60
Head lamp(Option)LowLEDLED
HighLEDLED
Turn signal lamp (STD)PY21W21
Turn signal lamp (Option)LEDL ...
 Turn Signal Lamp
- Removal
Outside Rear View Mirror
• When removing with a flat-tip screwdriver or remover, wrap protective tape around the tools to prevent damage to components.
• Put ...
Other information:
Hyundai Tucson (NX4) 2022-2025 Owner's Manual: Tire chains
Since the sidewalls of radial tires are
thinner than other types of tires, they
may be damaged by mounting some
types of tire chains on them. Therefore,
the use of snow tires is recommended
instead of tire chains. If tire chains must
be used, use genuine HYUNDAI Parts
and install the ...
Hyundai Tucson (NX4) 2022-2025 Owner's Manual: Tilt/Telescopic Steering
Adjust the steering wheel toward your
chest, not toward your face. Make sure
you can see the instrument cluster
warning lights and gauges. After
adjusting, push the steering wheel up
and down to be in the locked position.
WARNING
Never adjust the steering wheel while
driving. This may ...
